The Science of Double Exposures (And How to Make Them!)
Things we love here at our lab: cameras, films, and surprises.
Surprises for us come in all shapes and forms; sometimes we get candy inside the boxes delivered to our lab and sometimes we get to feast our eyes on the best double exposures of all time. It’s really a toss up for us which one we like better, but double exposures pretty much win first place. That’s why we have decided to dedicate a post on the science of double exposures and (bonus!) how to make them. Maybe, if you haven’t tried to create your own double exposure, you’ll be inspired to try it yourself so that you (and all of us, here at the lab) can enjoy that magical moment of being surprised with what you create.
Double exposures (and multiple exposures for that matter) is essentially capturing two or more images on one single frame. What you are essentially doing is “layering” one image onto another by not allowing your camera to advance the film to the next frame. By taking a picture without advancing to the next frame, you’re essentially exposing the same frame more than once. If you have ever severely over (and we mean over) exposed your film then you know that you will blow out the highlights of your film because of the oversaturation of light onto the film. This can happen when you double expose your film but with a little planning and strategy you can create some mind blowing magic.

THERE ARE TWO METHODS TO DOUBLE EXPOSE FILM:
1.) You can shoot an entire roll as normal (one shot for each frame), and after the roll has been shot and wound up, you can then use a film leader retriever tool to pull the film out again, and reshoot that same film, known as double exposing it. This method is useful if you just want to experiment and see what you can create with very little planning and if you love being surprised. This method may be a little more fun for an unstructured personal event in which you don’t have any deliverables (i.e. a day at the beach with your friends, at the circus with your family, etc.)
2.) Or you can double expose one frame at a time (for example, put one roll in your camera, take two images; and then advance to the next frame, take another two images; advance to the next frame, maybe just take one image on this frame; and so forth). This second method is useful if you don’t want to have a whole roll of double exposures but want to plan and take just a few shots when the inspiration hits you. This is probably the best method to use if you’re being contracted by a client or company, as you can be a little more thoughtful and planned should the inspiration strike you.
If you’re going to attempt the last method of making a double exposure and exposing one frame at a time, there are two essential components for doing so: you will need to know how to stop your camera from advancing the film, and you’ll need to plan on what images you’ll capture and layer onto one another. These two things are necessary because if your camera doesn’t have the capability to stop advancing to the next frame, you won’t be able to do or create double exposures (you can google the make and model of your camera to find the manual online to see if it’s possible for you to create a double exposure). And if you don’t have an idea or a goal in mind as to what you’d like to capture you may be disappointed with the result (or very very pleasantly surprised!)
THINGS TO KEEP IN MIND:
1.) Because you are exposing your film twice (or more times) you want to underexpose your shots. Earlier we mentioned that overexposing your film can lead to a loss of detail, so it would be best for you to underexpose by 1 or 2 stops for each shot that you take on the same frame. Having a light meter on hand to ensure you are underexposing by 1 or 2 stops will decrease your margin of error.
2.) When you take your first image, any highlighted parts (the white or light parts) from the first image will not capture or show anything after you take the second image. Your second image will only expose and be shown in the dark areas from your first image. For instance, if in your first shot, you take a picture of a black dot on a white page, the white has been completely exposed for on your film (it’s essentially been blown out). So when you take the second image, your second image will be seen only inside the circle of that black dot because the dark parts have not been overexposed like brightest parts of your first image have.

So once you’ve figured out how your camera makes double exposures it’s time to start creating them! There are a bunch of ways to plan, layer, and create double exposures. You can search the hashtag #filmdoubleexposure or #doubleexposurefilm on Instagram or check out Marcause’s project DUO:BSL which showcases some incredible double exposures for some insane ideas and inspiration! We’ll also give you two classic ways to make double exposures. Please keep in mind though, these are not hard fast or set-in-stone rules, use these only as a guide. When it comes to film, rules were made to be broken, so be inspired and break them!
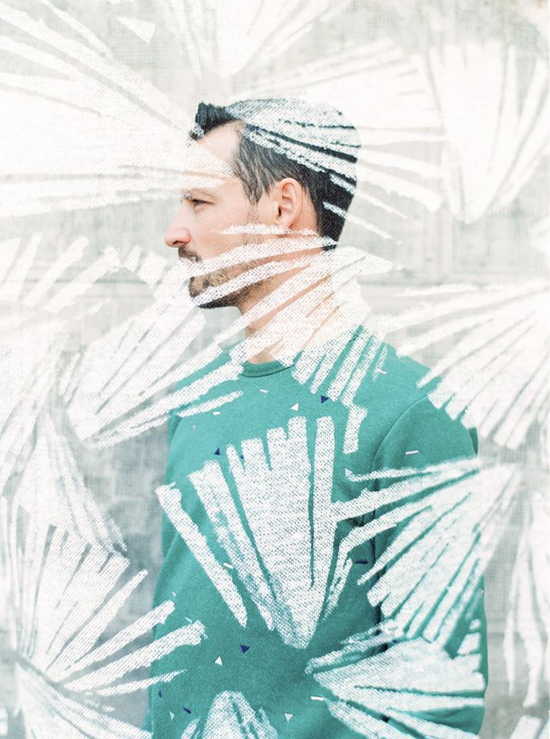
THE “OUTLINE” DOUBLE EXPOSURE.

This one is a classic and can be made edgy or romantic.
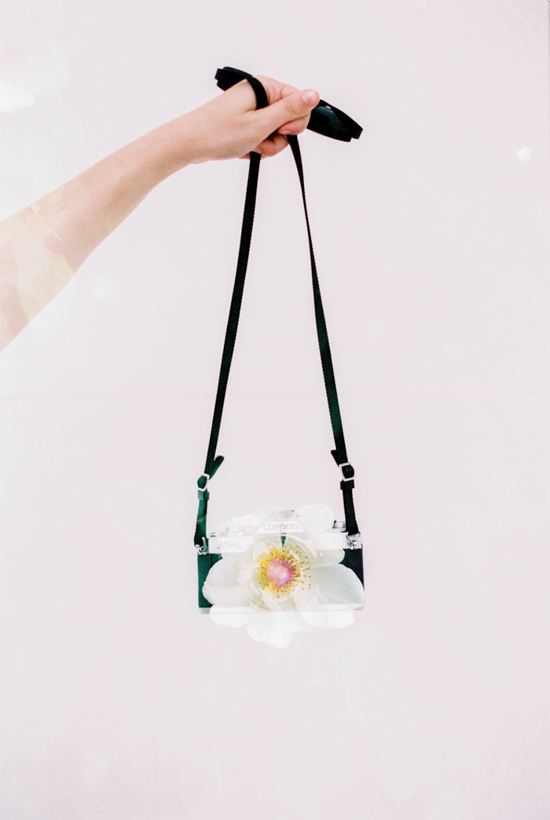
For the first image take a profile or straight on shot of your subject against a white or light wall, or back lit, making sure to underexpose your shot. Then think about what you would like to fill in your subject with when you take your second image. Maybe you could take a picture of flowers (those are easy to find on a wedding day), or a concrete structure, or a stack of guitars, or maybe even another shot of the person themself. Then take your second image, making sure again to underexpose your shot. The outline double exposure is great for adding depth.
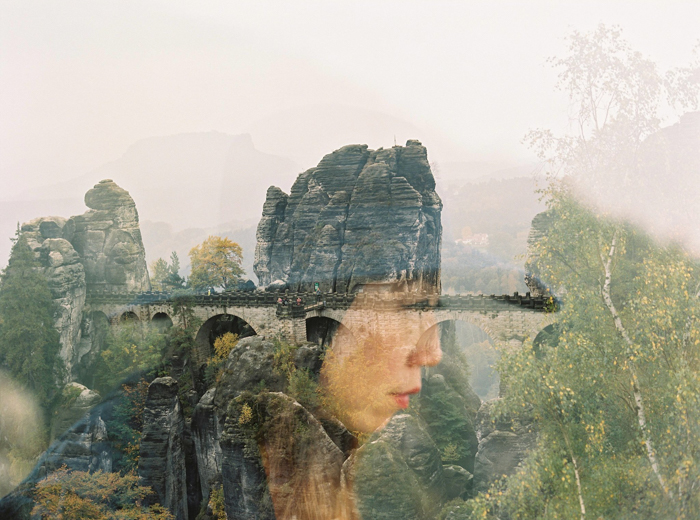
THE “LANDSCAPE” DOUBLE EXPOSURE.

This one can really set a scene and to us it always feels like it would make a good cover album photo. For the first image take a picture of your subject, could be a dog, or an object, or a human, or a couple of humans, anything, against a light background. Make sure to underexpose, ideally for this shot, by 2 stops. Then take a shot of the landscape, ideally your landscape would be a bit overcast to keep some detail in the sky, again we would recommend underexposing by 2 stops. This shot is a classic and always looks great.
TIPS TO MAKE YOUR DOUBLE EXPOSURES POP:
1.) When photographing humans, the darker the clothing they wear the better.
2.) Always keep in mind your first shot when composing and taking the second shot (especially remember if you took it horizontally or vertically!)
3.) You can always use things in your environment or nearby patterns as the filler for your second image.
4.) Underexpose more in bright situations or environments.
5.) Experiment, embrace mistakes, and most of all have fun!
Got a question about double exposures on your film? Drop us a line at ask@carmencitafilmlab.com! We’re always happy to help!

